Make Seeing a Habit!

The goal of any photographer should be to start ‘seeing’ and ‘visualizing’ the world through the aspect of a camera…in my opinion. Every moment you are in front of something you should be thinking “how can I shoot this”? Even if you don’t have your camera with you, getting into the habit of viewing everything as a potential image will assist you and improve your photography in more ways than you can predict. And don’t forget that you usually have important ‘practice’ and recording tools with you, which includes your cell phone’s camera.


I don’t always carry a camera with me, well, except for the one on my phone. It always seems that the best photographic opportunities seem to creep up exactly when I don’t have a camera. Every once in a while, my wife and children will ask me if I’m paying attention to them because they see my eyes glazing over, not because I’m not listening to them, but rather because I’ve started to mentally process a scene around myself that I think would make a great image. Of course, this is of little consequence to them and they struggle to understand why my thoughts are more on a potential picture than on their world, which is of course the most important thing in the universe, lol. Well, I’m not really intending to be rude, it’s just a habit I’ve picked up. Everywhere I go I have the tendency to ‘look’ for images, especially if I’m conscious of it and am challenging myself to see if there is a shot there. Luckily for me, they understand, and jerk me back into reality…for the most part. Although this habit might not be appealing to them, it does lend to an ongoing creative process that is constantly improving my ability to see and capture new images.


I’m not telling or suggesting that you start ignoring the people around you just to discover a shot, this is not advantageous, nor is it good while driving or speaking with the spousal unit, hehe, but you also can’t expect to grow as a photographer without constantly practicing the skill. Luckily, you don’t really need a camera to actively work on your skills. Simply looking at your surroundings for a possible image is actually quite enough to continue to grow your vision skills. The next time you have a mental moment to breathe, look around you and at your immediate surroundings. What is around you? How can you make an image out of what might appear to be simple or the mundane? Is there an obvious story around you, and if not, can you abstract a small portion of the scene into an image or story? This is part of the thinking that comes after the seeing in the See-Think-Shoot concept. Seeing is not just with the eyes, it’s with the mind, the soul, creativity, and everything else that goes with both seeing and thinking about what you are seeing, or maybe rather, that innate human trait of creating something out of nothing. Our minds are hardwired for creativity, and we should be thankful of that burning desire since it’s what led to harnessing fire, the wheel, language, music, art, the industrial revolution, space exploration, and on and on and on. A ‘rocket’ scientist doesn’t look at the stars and think about how the surface of a possible planet looks, instead, he automatically, as though he was a programmed machine, starts to mentally see a spaceship with a propulsion unit, guidance systems, life support, massive software, etc. Kind of like our ISO, shutter, aperture, focal length, etc. He sees the grand picture by mentally visualizing the individual elements. As photographers, we should do the same, all the time, or at least when it is safe or allowable.


You should always remember the tools you have on you. Did you know that many famous photographers over the years actually sketch the scene of an envisioned image before ever going home to get their camera? Ansel Adams was known to spend hours sketching a landscape ‘without’ a camera being anywhere near him, having to go home and return to that same spot when he felt the light would be perfect. Many photographers have an art background and can effectively draw or paint. I’m NOT one of them though. My stick figures don’t quite cut it. But…I do always have my iPhone with me. Every once in a while I will see a scene that I am just dying to photograph but don’t have my DSLR with me. So what do I do? Duh, I whip out my iPhone and take a temp shot, a tear sheet if you will, for a future shot. There are two positives to this practice. First is the obvious one, you can explore or check the feasibility of the image you are visualizing. The second, which is just as important to me as the first, if not more is that you now have a long term reminder that you need to get your camera and go back to realize your vision. I have Swiss cheese memory, I know it, my family fondly reminds me of it constantly, so I’ve learned to compensate. This ironic and unconnected issue and preventative measure has spilled over into my photographic life. It doesn’t matter if you take a temp record shot of your scene, sketch it out on a napkin, or even type yourself a quick email (I do this constantly!!!) or a note in your cell, just as long as you do it. Our brains are bombarded with massive amounts of data per day and even the best of memories can’t remember everything.


I know this sounds like another philosophical post, but it is quite the opposite! Anything, and I mean almost anything, that helps you develop (or in this case remember to create) more creative images, is in the long run, one of the most powerful tools you have at your disposal, and even more importantly, it is completely ‘free’. So the next time you’re sitting at Starbucks, outside of a restaurant, even in someone’s backyard during a get-together, remember to ‘see’ your surroundings and ‘think’ about where and how you can get your next image. Most of us improve our skills by practice, so ‘practice’ everywhere and anytime you can!


The following images were taken one afternoon, in less than an hour, in one of the most obvious, and free if you don’t encounter a nasty employee,…Home Depot! Yep, a stroll through the outdoor department just wouldn’t leave my brain alone even though I was there just to pick up some shelf brackets, so I literally gave in by going out to my car to get my backup camera that luckily was still in the trunk. By the way, if you ever run into a cranky employee there, simply tell them you are taking pics to help you and your other half plan on an upcoming renovation. Of course you’ll have to leave your tripod in the car to backup your story, but that’s a small price to pay to save you a lot of money travelling around the world to find some of those plants in the wild. Luckily, flowers and plants are not copyrighted or trademarked, so…



Home Depot flowers.

Home Depot flowers.


Cactus at Home Depot.

Cactus at Home Depot.


Orchids, not at a botanical garden, but rather Home Depot, 1/4 mile from my front door.

Orchids, not at a botanical garden, but rather Home Depot, 1/4 mile from my front door.


Although I wasn't fond of the overall scene, I loved the colour contrast so I turned off auto-focus and shot for a slightly out of focus image followed by some lower clarity softening.

Although I wasn’t fond of the overall scene, I loved the colour contrast so I push for a slightly out of focus shot followed by some lower clarity softening.

Focus on the Eyes!

When shooting people, one of the most powerful elements is the focus on the eye(s). Knowing this little secret along with how to set up your camera for the ability to concentrate on this very important aspect, will help you create stronger images. As always though, there are times to break this rule.


Psychology is one of the driving factors behind photography, believe it or not. Luckily, we don’t need a degree in psychology to benefit from understanding it, but learning and applying some of the more common aspects of this field will improve your images. One of those important psychological elements is how a person visually focuses on another. Even though most of us don’t realize it, we have a tendency to focus on a person’s eyes when we speak to them, so much so that if we speak or listen to a person and they don’t make/keep eye contact, we perceive that something is very wrong, which can range from suspecting they are lying, they aren’t listening to you, they are embarrassed, bashful, rude, and/or any of an ongoing list of social faux pas. The eyes are our ‘anchor’ to a person, the focal point, an age old practice that it is often linked to the saying, “the eyes are the window to the soul”. Photographs clearly express this concept even though most people go their entire lives without ever being aware of it. The vast majority of time, if the eyes are ‘not’ in focus, a photograph is uncomfortable, awkward, and/or down right crappy looking. So, whenever you are taking a photograph of a person or persons, make sure their eyes are in focus. I can’t stress this enough. Everything else on the human face in a photograph can actually be out of focus, literally, but the eyes almost always have to be in focus. So the rule of thumb is to make sure the eyes are always in focus!


Again, and I can’t say this enough…so I will again, ‘make sure the eyes are in focus’!!!


So how do we deploy this rule? For starters, we obviously need to start being aware of this EVERY time we take a pic. One of the most common problems I help people with in order to correct this problem is coaxing them away from multi-point focusing. All DSLRs today have multi-point focusing, which means that they use multiple points in an image to determine what the ‘camera’ thinks is the correct focus point. Unfortunately, the camera usually grabs multiple, often up to 7 or 8, points and creates a focus point/distance that is the average of all of these. This is great if you have a very deep depth of field (the range that everything is in focus from the closest to the farthest to the camera) like point & shoot cameras or setting your DSLR to an f/ stop such as 8 or 16. But if your depth of field is very small, you will need to focus ONLY on the eyes (or anywhere else you want to be the critical thing in focus).


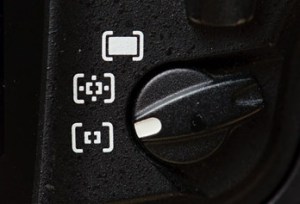
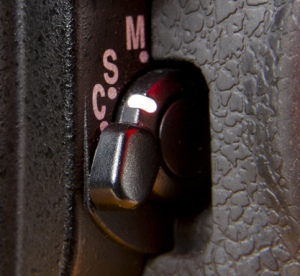
So how do you set up your camera to focus and lock only on the eyes? Two settings: the first is by switching your AF Area Mode from Dynamic Area AF (on Nikon) to Single-Point AF; and second, switching from Continuous-Servo Mode (C, also referred to as AF-C) to Single-Servo Mode (S, also referred to as AF-S). Each brand, and sometimes even model, has a different way to set the camera to Single-Point AF and Single-Servo Mode. Some cameras have an external switch for AF Servo Mode and AF Area Modes while other cameras have to be set somewhere in your menu. It is out of the scope of this article to cover every brand and model so check your manual or do a quick search on the Internet. The bottom line, start by switching to Single-Servo Focus Mode (1 focus point), and also set Single-Point AF Area Mode (non-continuous focusing). If your Nikon has external switches, here are the settings (again, I can’t show every type of camera or menu, so look up your settings in your camera manual):


Single-Point AF Area Mode

Single-Point AF Area Mode


Single-Servo AF Mode (AF-S)

Single-Servo AF Mode (AF-S)


Once you are in Single-Point AF mode, all you have to do is simply point that little ‘single’ rectangle (focus point) within the viewfinder at a single eye of the person you are photographing, depress half way to let the camera lock on and focus on that eye, giving you that beep if you haven’t turned the beeps off, then, while still holding the shutter button half way down after the focus is ‘locked’, move the camera around to get a proper composition and fully depress the button to take the actual shot. This allows you to get the eye(s) in focus and still make the shot you wanted even though the eye wasn’t at the dead center of the frame. To make this even easier, you can use your DSLR dial/buttons on the back of the camera to actually move the single focus point around in the viewfinder. If you are shooting a lot of shots where your focus point is off center, or if you just want to get in the good habit of moving your focus point around as needed, manually moving your focus point around to different points is a very useful habit/practice to get into.  For example, if you are shooting a group of people, chances are that all of their heads are at the upper 1/3rd horizontal line in the pic, which, if you move your single focus point up a space or two or three, you no longer have to focus and move the camera around since you can just line up the focus point at the exact place you want the/an eye to be. This is very helpful, especially when shooting a lot. A practice I highly suggest you make a habit.


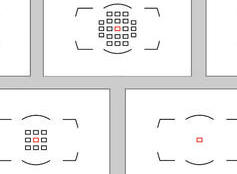
 All three of these have a Single-Point AF Area Mode. Notice the single red focus point?

All three of these have a Single-Point AF Area Mode. Notice the single red focus point?


Oh, before I forget…multiple eyes. When you are zoomed in on a face and the two eyes are at different distances from the lens, and if only one eye can be in focus, choosing the closer eye almost always works best. Although this can be broken, the vast, vast, majority of the time, the closer eye needs to be in focus for a great shot.


Of course there are times to break this rule, but not often. If a person or object is a secondary and/or unnecessary element in the photograph, then they can often be purposefully out of focus.


So, the next time you are photographing a person or a group, remember to keep the eye(s) in focus. This will help make for better and stronger images and will open up other ideas in regards to where and what you actually want to be in focus. Creativity is your unlimited learning curve, never fully satisfied being the necessity.


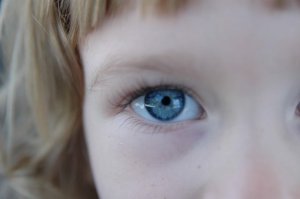
Here’s an example of how just one eye can be in focus, nothing else, and the shot still works.
Jonathon's Eye.

Jonathon’s Eye.


In this image, notice that the eye is actually the point/story, everything else being either eliminated from the composition or out of focus.

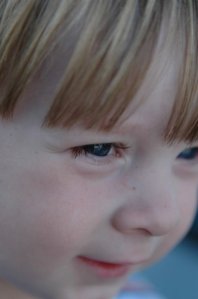
Savannah's Eye.

Savannah’s Eye.


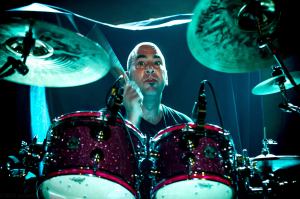
Drummers are a perfect example of getting the eyes correct. Notice that in the image practically everything is at least slightly out of focus except the eyes and face, drawing your eye to his face and putting less emphasis on the drums and other details.

Mike Cosgrove of Alien Ant Farm.

Mike Cosgrove of Alien Ant Farm.


And finally, John Galvin with Molly Hatchet. Notice how John’s eye glasses, in this case being a surrogate for his eyes, are tack sharp while Shawn Beamer, the drummer, in the background is out of focus. In this case, if Shawn had been in focus, there would be confusion about who/what the pic was about.

John Galvin with Molly Hatchet.

John Galvin with Molly Hatchet.


Contrast in Images, High/Low Key

What is contrast? Contrast is the difference between the darker and lighter tones and colours in an image. The more stark the difference between those dark and light sections, the more contrasty the image is said to be. If the image is less contrasty then it has a more subtle difference between those lights and darks, sometimes going to an extreme milky or dreamy look.

So is contrast good and/or should every shot have high contrast? Not necessarily. Most images with high contrast tend to pop out and feel a little more alive, but it can be overdone. When software is used to increase the contrast levels too much, the image starts to look odd and unnatural. Looking for better contrast when shooting the shot usually makes for better contrast since it reflects a natural look.

An extreme technique of high contrast is called low key photography, where there tends to be a lot of black with selective areas ranging from under to slightly over lit, creating a very stark difference between what is quite often a pure black background behind a well lit subject, creating that stark contrast, the difference between the extreme black and lights. Think of a mime, with pure white on black, which at the edge of the paint is about as contrasty as you can get.

But…high contrast is not necessary to make a good image. In fact, many great images actually go the opposite direction and go for low contrast. As you might imagine by now, low contrast has lessor and softer tones in an image. A common low contrast technique is called ‘high key’, where the image is usually brighter, less overall details on average, and a dreamy look to them. Whereas low key shots usually have black backgrounds with small amounts of well lit areas, high key shots are normally pure white throughout the majority of the image, especially the background, with softer low contrast details.

Low, high or medium contrast, none are automatically better than the others. It’s each individual image that will dictate how much or how little contrast will make the image what you want, need, or prefer. But understanding the basic concept of contrast and how to use it can definitely improve your creativity and power in your images.


Although black and white is popular with low key photography, you can still shoot in colour to get the effect.

Buddy Guy

Buddy Guy


Here’s a not so extreme low key shot.

Mike Barber

Mike Barber


An example of a moderate high key shot.

Aria

Aria


Although this shot is not a true high key image due to the off-white background, it can still be considered to be pushing the concept.

Savannah Tremain

Savannah Tremain

High(er) ISO

Let me start by stating that I am a high ISO junkie. Spending several years as a concert photographer has made me become intimate and comfortable with higher ISO values. What is ISO? Well, for starters, I am not going to get technical on you since that is a page or two on it’s own, especially how it interacts with shutter speed and aperture, but I will cover how to use it and why.

ISO is basically the sensitivity to light of the sensor, or film in the old days. ISO 400 captures twice as much light as ISO 200, 800 four times as much as 200, 1600 eight times as sensitive as 200, etc., etc… This basically allows us to use slower shutter speeds, which is very helpful at night and in other dark situations. After all, who wants to look at a black photograph with nothing or little detail? What’s the point, lol?

There is this huge fear about ISO, mostly due to a complete lack of understanding of it, it’s true limitations, and it’s necessities. Most of our DSLR cameras default to a 100 or 200 ISO. The general rule of thumb is that the lower the ISO, the less problems in the image such as those nasty little green and red speckles along with loss of detail/sharpness. The reality is that each generation of DSLR, and other types of cameras, are consistently getting better with higher ISO values. Just 10 years ago, even ISO 400 was almost too noisy to use on the top end DSLRs, while today, most DSLRs above $600 or so can easily handle ISO settings of 800 or maybe 1600 with little or no degradation to its images. This is great news since it allows us to take images in darker situations that were previously only capable with expensive film.

Many DSLRs now have an auto-ISO setting that allows the camera to add a changing ISO that works in tandem with shutter and/or aperture depending on the auto setting chosen. Read your manual, or better yet an after market book, on your specific camera model to understand how to set this setting. The better DSLRs also give a minimum/maximum range you can set so the auto mode of the camera doesn’t use a high ISO setting that is too high. The down side is that you will have to play around with your own specific camera and experiment to determine how high your ISO can go before it starts degrading your images.

At concerts, I’m using ISO in the 1600-3200 range. The good news is that software can now remove some, and often all, of the nasty colour speckles that are introduced into images through high ISO settings. Again, another area you will need to experiment with your particular camera. The quickie on removing noise is to find the noise reduction setting in your camera and/or your software such as Lightroom, Aperture, or Photoshop. There are plenty of free tutorials on the net that will show you exactly what high ISO noise looks like and how to get rid of it.

Remember that the purpose of this post is not to teach you specifically about ISO and all it’s intricacies, but rather to start using it. If you’re walking through a nature trail, at a late night soccer game with the kids, camping, etc., and it’s just a little too dark (not pitch black) to take pics without the shutter staying open forever, try increasing your ISO to see if you can speed the shutter up to get a shot. And as I mentioned, you need to experiment with your camera to understand it’s limitations. Try setting your ISO to 800, 1600, 2500, and even 3200, and walk around the house to darker areas and take some pics at each ISO setting at the same place and compare them to each other on your PC. If it looks too bad or unusable, then you have a benchmark to start working with.

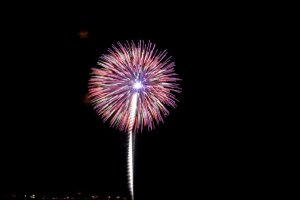
Fireworks shot with ISO 3200.

Fireworks @ ISO 3200

Fireworks @ ISO 3200

Shooting in a museum, I had to use ISO 1250 and STILL used a slow shutter speed of 1/15th of second and very wide aperture of f/2.5 since I couldn’t use a flash.

Piano @ ISO 1250

Piano @ ISO 1250

I shot this image of Peter Frampton in concert using ISO 2500 due to the lower light combined with a 1/60th second shutter speed with a 200mm lens, something not advisable due to the camera shake introduced by the hands. But with multiple frames per second, there are almost always images still in perfect focus, even with such a slow speed.

Peter Frampton @ ISO 2500

Peter Frampton @ ISO 2500

Why do I often use a flash during the daytime?

Why do I often use a flash during the daytime??? Yes, that’s a question I actually hear quite often when shooting people during a moderate to well lit day. The simple answer is to evenly light an entire face.

There are a few problems that one can encounter when shooting with natural sunlight:

First, is the horrible shadows. Oh my, how I truly hate seeing a photo with that dreaded dark eye socket look that is a cross between a skull and a raccoon. This is usually due to the sun being too high in the sky and/or at a bad angle causing shadows to form in the depressions of the face. The steeper the angle and/or the brighter the sunlight, the more stark the shadows will stand out from the rest of the face, sometimes even going as far as a magic trick where the eyes seem to disappear into a dark void.

Second is the colour cast. Natural sunlight tends to be warm, and as in warm I mean with a nice little yellow tint, giving the face a wonderful suntan look. This is usually not a bad thing, after all, most of us pale white people would like a nice soft tan without baking on the beach, working on our melanoma collection. But…that extra ‘free’ tan can often make someone warmer (more yellow) than you would like and/or cause other objects in the frame to have the same yellow cast. Imagine the Star Spangled Banner being sung as “red, yellow, and blue”!?!? Yellow stars and stripes are not exactly agreeable on a flag, and there are many other situations where whites being shifted to light yellow is not a good thing.

So how do you solve the harsh shadows on the face and colour cast?

Well, colour cast ‘can’ be as simple as changing your white balance and/or the camera adjusting the white balance for you, but then you lose that nice tan, this being an unfortunate trade off. You can always move the subject away from anything that has to be pure white and then use that wonderful sunlight to get a free tan. You can also change your white balance in-camera to cloudy (or equivalently name setting), which warms up the photo because it assumes that everything is a little cooler (a slight blue cast) than normal. And a final trick is to change the colour temperature within your favourite photo editing software, which is often the best and easiest way of ‘correcting’ or ‘changing’ your colour cast ‘after’ the shot.

But…my favourite trick is to simply use a flash. Why? Because of ‘all of the above’ mentioned earlier, which is that a flash evenly fills in the entire face, eliminating those shadows, and the flash also speaks to your camera and tells the camera to shoot at the same temperature as the light coming out of the flash, which is normally a balanced and correct white, eliminating the colour cast issue. Keep in mind though that if the flash is too weak or too far away, the flash might not get enough light to the subject allowing some of that yellow cast to still creep onto that pretty face, or worse, only one side or area. Also, remember that the flash only illuminates what it can get to, so anything outside of the flash range, such as a flag in the background, may or probably will still have that yellow cast. But all in all, when shooting a portrait or group shot on a sunny or even overcast day, using a flash usually guarantees that those mugs will be correctly lit with the colour you expect.

Oh, btw, get a real flash! I’m talking about that giant flash you put on top of your camera. Those tiny built-in flashes on the top of your camera are usually not very strong, very harsh, and cover a very small angle, which can lead to only the person in the middle of a group shot to be properly lit while the people on the far left and right to be coloured differently, and even worse, barely or not lit up at all losing them to a dread black void.

There are also flash diffusers you can purchase to put on your flash, and believe it or not, even for those built-in flashes. These help soften the light, making the face look a little better, reducing harsh lines and shadows that natural features can cause from even a flash such as giant dimples or sunken eyes. Grandma doesn’t like shadows accentuating her wrinkles, lol. But now I’m wandering into another post on it’s own right.

So…? Try using a flash the next time you’re taking a portrait or group shot during the daylight. In fact, take two shots, the first without a flash and the second with a flash, and then compare them on your computer at home. You’ll probably be surprised how differently they look.

Btw, do I always use a flash during the day? No! But I do use one when I know and/or see that there will be a problem and need for one, which takes a little practice and an attention to detail.

Come to the light side. Our cookies have less calories than the dark side. Bwahahahaaa… (Yes, bad joke.)

Here’s an example of using a flash on a sunny day. Although the sun was at high noon, which if you look real close at the tops of their heads you’ll see where the sunlight blew out the tops of the hair, the flash allowed me to get a perfect exposure of their faces.

Cemetery Wedding

Cemetery Wedding


The next two pics were taken literally less than a minute apart. The first will show the harsh lighting of the sun, with dark shadows on the sides/back and almost too bright highlights on the front.

Evening Shadows

Evening Shadows


…and this shot shows how a flash filled in the face, which was unevenly lit, unlike the last shot.

Flash Filled Evening

Flash Filled Evening

Dimensional Photography

A Photograph = ((Space-Time / 2) / Focal View)

What the heck does that mean? LOLOL. Yes, there’s a method to that mad equation.

First, if you know Einstein, then you know there are four dimensions, the three traditional so-called ‘physical’ dimensions, but also time thrown in for good measure (I’m cracking myself up here, lol, smh). As a photographer, we are all too aware of how ‘time’ affects our images, each image being a split second moment in time captured via light. So not only does photography collapse three dimensions into only two dimensions (width and height, but the camera eliminates depth), but it also collapses and compresses time into a very tiny moment, a lot of the time, hehe, pun intended, down to just 1/60th – 1/250th of a second when using a flash. And for focal view, or focal length, our lens only sees/passes through an even smaller view of the world onto the camera sensor. So at 200mm, we are only recording an extremely tiny portion of our 3D world, ignoring the rest of time outside of our shutter speed.

So…each photograph is only half of the dimensions we experience, cut down to a tiny little window in one specific direction, and only for a ridiculously short period of time. It’s kind of like recording a single note of a single song of a single album on a CD, trying to sell that CD as a musical work of art, and expecting people to pay for it. WOW! No wonder photographers struggle to make a living. LOLOL.

The Mind’s Eye

The human mind is the greatest version of Photoshop ever, the eyes the perfect combination of aperture, shutter and ISO, with the heart being the perfect mouse for touching up the real world. We don’t need layers to see beauty where there isn’t, no histogram necessary to perfectly expose an image in our mind, and no brushes or healing tools necessary to see past imperfect features.

This isn’t meant as metaphor, but the reality of what a photographer has to overcome each and every shot taken when exposing with intent and purpose. Our eyes trick us into seeing a world that doesn’t exist, facebook and flickr expose this flaw millions of times per day. Even our LCD on the back of the camera does not match what we open on our computer.

The real art of photography is training the eye not to see the beauty we delude and deluge ourselves with constantly, but rather to see the real world in front of us and figure out how to grab a single tiny frame of wonder hidden within a grandiose 360 degree view.

Tack Sharp

Sharpness, and the absence of absolute sharpness, can and often does make the difference between a good/great image and a bad one. When photographers use the term tack sharp, they are speaking about the sharpness of finite detail in an image.

Sharpness is actually made up of two elements, crisp focus that is usually seen as lines, along with contrast. That’s right, contrast is actually almost as important as the actual sharpness of a line within an image. Contrast allows lines to stand out visibly and clearly allow the eye to determine that a specific element within a photograph is in deed in sharp focus. An example of having an image in sharp focus but with little contrast is clouds. Although the edges of a cloud might be in perfect focus, there is very little contrast within the inner details of the cloud leading to a fluffy look, even if you were to discover that those little tiny details in the soft part of a cloud were in fact sharp when you start to pixel peep in a software editing program. The low contrast causes those sharp features to actually disappear within the greater whole of the image and appear soft. This isn’t always bad, but in most photography, soft and fluffy doesn’t look realistic nor accurate.

There are many tricks to improving your ability to take tack sharp images such as faster shutter speeds and a tripod, but those are really subjects for another time. The important point is to try to make your focal points as sharp as possible, where applicable. The oldest and most common points of extreme importance for sharpness are the eyes of a person in a portrait, and landscape photography. While landscape photography usually dictates that everything from the closest to the farthest element be in perfect detail, portraits are a little more creative in that you really only have to make sure the eyes are in perfect focus, everything else can quickly fall out of focus but the image is perceived as natural and correct due to the way the brain processes images of faces, which is centered around the eyes.

Your goal is to identify the most important element(s) in a scene and make that/them perfectly in focus when possible. Sometimes you can fudge it a little, using software to do a little sharpening for you, but software is no replacement, and often an excuse, for taking sharp images. Post production is a great place to ‘enhance’ the sharpness and contrast of an image, but be very careful to not overdo it as that can lead to an unnatural look that can be just as unpleasant as a soft image.

But don’t think that everything always has to be sharp. There are often times, in fact all too often, that you want elements to not be in focus, especially something that doesn’t support the primary focal point in the scene. You can even have out of focus elements closer to you, such as leaves for example that you are shooting through to that tack sharp person/subject that gives an almost voyeuristic or candid look, but take care to consider what needs to be in focus and not. Other times though, intentionally softening the focus, even on your primary subject, can in fact create a beautiful image, but that takes some practice and a good eye, all too often being an accident that one discovers to be appealing, a good reason to not automatically discard every image that appears to be out of focus before taking a closer look.

So start paying more attention to trying to get sharper images. Sharper images usually lead to better images. After all, who wants to try to figure out what something is just because it’s fluffy? How many beautiful pictures of an out of focus flower or a fluffy face have you seen lately? I bet it’s not many…

A typical Florida landscape shot of a salt marsh. Imagine if anything in this image, other than the appearance of the clouds, looked soft and out of focus. Not good!

Castaway Island Salt Marsh

Castaway Island Salt Marsh

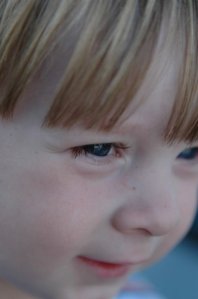
Look at this image of my son from many years ago. The closest eye is in focus, making the image appear realistic. There is a very small depth of acceptable focus within this image, but it still works because it’s the closest eye in this image that counts, not his hair, skin, or background.

My Son Deep In Thought

My Son Deep In Thought

Take a look at this image and notice what is the focal point and what isn’t. Phil McCormack of Molly Hatchet caught me sneaking a side-stage candid shot and hammed it up for me, giving a very cool moment to capture. I used another technique in this image that I love, framing. The head, body, arm and bass guitar of Molly Hatchet’s bassist, Tim Lindsey, creates a very good frame for Phil, and although Tim is not the focal point of the image, as another musician on stage, he supports the primary element and ‘story’ of the image. If Tim’s arm and head had been in perfect focus, the image would have become very confusing and noisy, instead of making the viewer focus on the singer, Phil. Same thing for the background. Although the lights are definitely not attractive, the eyes take only a split second to look at them and then you instantly go back to Phil, which again, if they had been in focus, it would have been distracting. This image in it’s totality shows how to use selective depth of field and focus to force the viewer to concentrate on the primary subject while not being distracted by anything else.

1398672_10201232162666740_1043872657_o

Molly Hatchet’s Phil McCormack

Leading Lines

Leading lines. What are they and why should you use them? When to not use them.

Leading lines are anything, yes anything, that leads the eyes to your focal point within an image. Leading lines are quite often lines, but they can be a natural element that draws, or ‘leads’ the eyes to, back to, or even throughout the image, usually supporting your primary subject/focal point. For example, in concert photography I often look for those moments when a singer stretches out his arm. By making sure that the face is in focus, along with a good composition, especially my absolute favourite ‘triangle’ within a composition, which I’ll address in a later post, the arm is a natural line that brings your eyes right to his face, even when the arm isn’t in perfect focus. Lines in a field that lead to a barn is another example. The important point in the image should be at the end of as many of those lines as possible, which usually strengthen the image.

Leading lines aren’t always leading specifically to something though. If you notice, many of my abstract fine art shots are of interesting bricks and other similar rock patterns. I love discovering a new building or wall that has a beautiful brick or stone outer. But even then, if I can compose it just right, those lines, no matter where you start within the image, lead you throughout the image, from one area to another, showing you a new area, pattern, and especially a different texture, which I really love. Guard rails on a bridge, the slow curve of a bridge, the slowing decrease in size of a dock all can lead you to something you want to express within a pic. Even a horizon can be used to bring you to a surfer taking advantage of a breaking wave with a stark contrast of the white cap breaking at the edge of the tube he is trying to thread.

But…you quite often don’t need a leading line, and more importantly, sometimes a leading line may actually detract from a composition. For example, isolating a subject in a vastness of contrasting surroundings can be very powerful. A seagull against a beautiful sky of clouds and blue forces only one place to start and end. Often, a line is the composition itself. For example, a recent image I made of the circular opening of an old rusted pipe, where several concentric rings of contrasting line and textures was the actual image itself, with the lines being a never ending route of moving around the image in repetition, with each revolution drawing the eyes to a different area of contrast, colours, tones, and textures, a tantalizing continuing trip for those who can see more than just a pipe.

So look for those leading lines that can draw the viewer to your subject(s), but don’t be afraid to recognize those shots that leading lines would detract from, and you are on your way to improving your compositions, even if the viewer can’t figure out why they like and are drawn into your shot.

Here is an example of a very leading line. The image itself is not an award winner, but the wooden bridge ends up allowing the viewer to discover the very low profile fisherman and his fishnet.

Fisherman and Leading Lines

Fisherman and Leading Lines


Here’s a cyclic set of leading lines. The lines themselves are the actual composition.

Cyclic Leading Lines

Cyclic Leading Lines


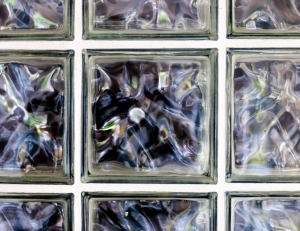
Here’s an example of a composition that has no apparent purpose. But it is balanced for some reason, without making anything clear. Once you view the image, think the rule of thirds and look at it again, lol.

Glass Rule of Thirds

Glass Rule of Thirds

Don’t Spend Too Much For A Camera.

Never spend more than you need to for a camera. I’ve harped on it over and over about the best cameras being the one you have on you and/or the one that takes the images you personally want and like or need. Lately, I have been looking over my shelves, emphasis on ‘shelves’, of photography equipment. I have a D200, D300, D70 (I’ve actually lost it in a very safe place in the house somewhere, smh), a pair of D80’s converted to visible with nIR & nIR/nUV (visible + near Infrared, the other visible + near Infrared + near Ultraviolet), a pair of D90’s for my family, and of course my concert/low-light workhorse D3s.

But lately, I have actually put down my exercise program D3s system and gone back to my old and trusty D300. Why? Well, it takes the images I want to get for what I’ve been doing lately, mostly fine art and creative imaging. Would my D3s take superior images? Definitely…probably…maybe…eh…if I start pixel-peeping! I haven’t printed anything above 14×17 in a long time, so even my D300 makes excellent 8.5×11’s and even 14×17’s if I didn’t need to crop very much.

My D300 weighs just a fraction of, is a third of the size of, and 1/20th of the price to replace than, my D3s…nice. And that D300 takes images far exceeding what I need for facebook! So what if I need a much more detailed, higher quality, more low-light flexible camera? Well, the good thing about shooting inanimate objects for fine art is simple…they are usually still there if I return, I can recreate and/or return when the same lighting was available, they work on MY schedule, and I don’t have to pay them to show up for another shoot, not to mention they don’t require a model release, lol. So all I have to do is return with my more expensive body if I need to.

More nice things about my D300 that I like is that I can replace it used for $300.00 versus $4000-$5000 for a used D3s, it actually takes pretty/really good concert shots when there is good lighting, it doesn’t weigh much, it accepts all of my expensive $2000-$3000 lenses, and I can fit it into almost any small camera bag with a 50mm f/1.4 attached to it.

So why should I carry around a $6000.00 body to take the equivalent images of a now $300.00 body??? Good question. My answer has shifted to “you don’t”! I’m even considering purchasing one of the new plastic 50mm f/1.8 lenses, while only a fraction of the cost of my awesome all-metal 50mm f/1.4, the quality of images that that cheaper lens is delivering is far exceeding what I actually need out of it, and only 2/3rds of a stop slower is NOT going to hurt me in almost all situations. So why should I risk my older $500.00 lens that isn’t even made anymore when I can put an equivalent $200.00, or $100.00 grey market version, brand new DX version on that DX body? Well, I hope you get the point by now.

In this industry now, cheaper no longer automatically equivalates to lessor quality, and in the same fashion, more expensive doesn’t guarantee superior quality, especially for the vast majority of what we are normally shooting. I am not going to spend $500,000.00 for a Lamborghini to drive to work, just down the street, if I can do the same exact job with a $15,000.00 Camry, not to mention the insane maintenance costs differential.

So go dust off those old, seemingly lost investments, and see what you can get out of them. You might be very surprised, not to mention pissed at yourself, when you discover that you’ve been wasting perfectly good equipment, and even worse, probably even considering how to afford your next expensive camera body, when you might already have exactly what you really need. Think about it. Step out of the rat race. Yes, some people are convinced that image is everything and that an expensive and huge pro-level camera is necessary to keep up the image of being a pro photographer, but in most cases, it’s the images that count, not your image. Oooo….I like that! One more time…

***It’s ‘usually’ your ‘images’ that count, NOT your ‘image’.***

Here’s an example of a pic taken with a $350 (on sale) Nikon P7100 point and shoot camera:

Nails In The Backyard

Nails In The Backyard