The True Trilogy of Photography

I believe there are only three aspects to photography, which when mastered collectively, the beginner and/or average photographer can graduate to some varying level of good to great. Although there are any number of divisions of subjects, most, if not all, can be clearly placed in one of the three primary categories, and sometimes, maybe more than one.

The three categories are Technology, Exposure, and Composition. While Exposure and Composition are the meat and bread of photography, and are often enough to take great shots, the understanding of the Technology you are holding all too often makes the final difference when combining all three.

Technology is understanding the limits of your gear. It’s knowing the max aperture and understanding it, how good your camera is at any given ISO, size of images and their applicable resolution to usable screen and/or prints, how lenses compress or distort, battery performance, accessories that actually give you a return on investment, and so, so much more.

Exposure is creating correctly lit subjects and scenes. It’s understanding how the physical components of Technology in regards to Shutter/Aperture/ISO work together in order to see, not see, emphasize or demote elements within the frame, and balancing the overall image in order to make a usable and hopefully aesthetic image.

Composition is creating a compelling image at some level and/or to some audience. It’s knowing how to place elements within a greater picture, showing or not showing something to give you some message or feeling, targeting your audience, and telling ‘a’ or ‘your’ story.

Exposure and Composition are often seen or used in tandem for/in many aspects, but understanding how each works independently is critical along with how the technology of the given camera being used affects the ability of composition and exposure.

Too many people tend to go out purchase an all-in-one book hoping to learn everything by the end of the book. Well, it’s a beautiful idea but usually a monetary and educational loss in the end. Most beginner/amateur photographers I have run across have at least one to three, often more, of these books taking up both valuable shelf space and cash investment. At an average of $50 a piece, these all-in-one books are a costly shelf anchor after you realize that you became a victim to statistics and never got past chapter 1, 2 or maybe even 3 (congrats to you if that’s you). This is the second most costly mistake for photographers, usually right behind buying a bunch of accessories and/or lenses that you either didn’t need or have no clue how to use to the full monetary value of each item. The greatest mistake usually being purchasing those more expensive lenses or even a ‘better’ DSLR thinking that will improve your photographs, but again, is a failure if you don’t know how to squeeze the most out of those specific features that drove up the price of that item. E.g. if you purchase a 50mm f/1.4 prime lens for $500 instead of a 50mm prime lens f/1.8 for $200, AND you don’t consistently shoot at f/1.4, well…the math is obviously $300.00 USD!!! That $300.00 of other accessories or books you could have purchased at a much greater potential return on investment.

My suggestion to the above point(s) is to first learn how to use what you have on a hardware level (the DSLR and lenses you ALREADY own) starting with the camera manual or one of the nice color third party replacement manuals, purchase a book on composition and a book on exposure with ratings of four or five stars on Amazon that have ‘less’ than 200 pages or even 150 pages. These shorter books are easier to finish and have a distinct advantage of concentrating on one meta-subject instead of 30-50 attempts to make unique subject chapters in the all-in-one books. I myself probably have $500 in print all-in-one’s and another $2,000+ in digital versions, and I’ve never finished a single one! I also have at least 100+ hard copies of specific/specialty ‘subject’ books and another 300 or so digital versions, and I’ve probably read a quarter of them all and quite often multiple individual chapters in each, using the vast library as a reference collection. In other words, I’d rather buy a $30-$40 specialty subject book and read 25-100 pages in each than to purchase a $50-$75 all-in-one and only read the first 20 pages and get bored before chapter two tries to explain electronics and the difference between a photo-receptor and a pixel, much less how the Bayer system works (which by the way, I personally like, BUT, it has no real value to your being a better photographer).

So there you are. Buy a book on composition first, that you can finish, then purchase a book on exposure, that you can finish, and then go and read a better manual on your camera to figure out what and how to use all those cool features that you need to know in order to get off and away from all those auto modes that horrifically constrict you in certain situations. Although there are places and times for auto modes, I use them on occasion myself, the true control and full potentiality of your photographic skills usually comes from shooting in complete manual mode (minus the few auto settings in-camera, NOT Aperture/Shutter/ISO). Master Composition first, then Exposure next, and finally the Technology in your hands, and you will propel yourself years, and sometimes decades, ahead of your peers with same exact equipment in hand.
3 Tools for Depth of Field

Depth of field, or DoF, is one of my favourite subjects and tools. Although DoF can very quickly become a complex subject with many nuances, I’m going to tackle the most basic concepts and more importantly the three main factors you can instantly and easily learn to utilize this valuable concept.

The simple definition of DoF is the range, or depth, of acceptable focus. Another way to put it is DoF is the distance between the closest and farthest points away from you that are still in acceptable focus. If someone says they have a depth of field of 3 feet, they mean that while they are focusing at a single point, there is a total depth/range of 3′ in focus, part of which is in front of the point they are focusing on and the rest behind the focus point. So with the 3′ DoF example, if I was focusing at 10′, the depth of field could be from 9′ to 12′. The actual depth of field, along with how much is in front of and behind the point of focus can vary due to several factors, but for the sake of this post I am going to stick with the three simplist factors, which are lens aperture, lens focal length, and focus distance (distance between you and the point you are focusing on.

I’m now going to distill down to three simple points how each work! How’s that for fast?

Aperture! The larger the aperture (i.e. the smaller the number), the shorter the depth of field. The smaller the aperture (i.e. the larger the number), the longer/deeper the depth of field. So…at the same exact distance of a specific point you are focusing on, an example of DoF via aperture could be say 3′ at f/2.8, 10′ at f/8, but a whopping 100′ at f/16. Easy enough so far?

Lens Focal Length! The longer (higher number of mm) the focal length, the shorter the depth of field. The shorter the focal length (lower number of mm), the deeper the depth of field. So…at the same exact distance of a specific point you are focusing on, an example of DoF via focal length could be 1′ at 200mm, 5′ at 50mm, and a nice 20′ at 24mm. Still with me? Hope so!

Focus Distance! The closer the subject is to you, the shorter/smaller depth of field. The farther away a subject is, the deeper the depth of field. So, with the same exact aperture and focal length, a subject at 5′ away from you might have a depth of field of maybe 6 inches, while the same subject and other settings at 10′ away from you might have a DoF of 3 feet, and a focus point on a subject at 30′ might have a depth of field 10 feet. So far, so simple?

Here’s the short-hand, abbreviated, or rather cliff-notes:

Larger/Bigger Aperture (smaller numbers like f2.8), longer focal lengths (bigger/higher mm #’s), and the closer the subject is to you, ALL make the effective depth of field smaller/shorter.

Smaller Aperture (bigger numbers like f/22), shorter focal lengths (smaller mm #’s on the lens), and the farther the subject is from you, ALL make the effective depth of field longer/bigger.

Another quick way to remember it is:

Small/Short Depth of Field – Large Aperture, Long Focal Length, Close Subject.

Large/Long Depth of Field – Small Aperture, Short Focal Length, Far Subject.

or

Very Small/Short Depth of Field Examples – f/2.8, 200mm, 5′ away.

Very Large/Long Depth of Field Examples – f/16, 14mm, 40′ away.

I hope this helps. It’s a quick way to remember DoF and how to increase or decrease it. Subject distance is easier to remember (longer distance = longer DoF), but aperture and focal length are counterintuitive when you think about the numbers (bigger aperture and bigger focal length = smaller DoF). BUT, always remember that a smaller aperture number is bigger, while a bigger aperture number is actually smaller.

Go have some fun experimenting with these examples and concepts to master them, or even remember them, lol.

Focus on the Eyes!

When shooting people, one of the most powerful elements is the focus on the eye(s). Knowing this little secret along with how to set up your camera for the ability to concentrate on this very important aspect, will help you create stronger images. As always though, there are times to break this rule.


Psychology is one of the driving factors behind photography, believe it or not. Luckily, we don’t need a degree in psychology to benefit from understanding it, but learning and applying some of the more common aspects of this field will improve your images. One of those important psychological elements is how a person visually focuses on another. Even though most of us don’t realize it, we have a tendency to focus on a person’s eyes when we speak to them, so much so that if we speak or listen to a person and they don’t make/keep eye contact, we perceive that something is very wrong, which can range from suspecting they are lying, they aren’t listening to you, they are embarrassed, bashful, rude, and/or any of an ongoing list of social faux pas. The eyes are our ‘anchor’ to a person, the focal point, an age old practice that it is often linked to the saying, “the eyes are the window to the soul”. Photographs clearly express this concept even though most people go their entire lives without ever being aware of it. The vast majority of time, if the eyes are ‘not’ in focus, a photograph is uncomfortable, awkward, and/or down right crappy looking. So, whenever you are taking a photograph of a person or persons, make sure their eyes are in focus. I can’t stress this enough. Everything else on the human face in a photograph can actually be out of focus, literally, but the eyes almost always have to be in focus. So the rule of thumb is to make sure the eyes are always in focus!


Again, and I can’t say this enough…so I will again, ‘make sure the eyes are in focus’!!!


So how do we deploy this rule? For starters, we obviously need to start being aware of this EVERY time we take a pic. One of the most common problems I help people with in order to correct this problem is coaxing them away from multi-point focusing. All DSLRs today have multi-point focusing, which means that they use multiple points in an image to determine what the ‘camera’ thinks is the correct focus point. Unfortunately, the camera usually grabs multiple, often up to 7 or 8, points and creates a focus point/distance that is the average of all of these. This is great if you have a very deep depth of field (the range that everything is in focus from the closest to the farthest to the camera) like point & shoot cameras or setting your DSLR to an f/ stop such as 8 or 16. But if your depth of field is very small, you will need to focus ONLY on the eyes (or anywhere else you want to be the critical thing in focus).


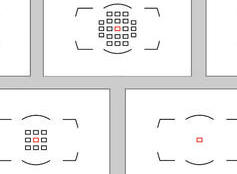
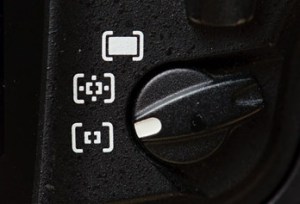
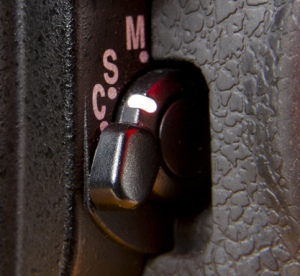
So how do you set up your camera to focus and lock only on the eyes? Two settings: the first is by switching your AF Area Mode from Dynamic Area AF (on Nikon) to Single-Point AF; and second, switching from Continuous-Servo Mode (C, also referred to as AF-C) to Single-Servo Mode (S, also referred to as AF-S). Each brand, and sometimes even model, has a different way to set the camera to Single-Point AF and Single-Servo Mode. Some cameras have an external switch for AF Servo Mode and AF Area Modes while other cameras have to be set somewhere in your menu. It is out of the scope of this article to cover every brand and model so check your manual or do a quick search on the Internet. The bottom line, start by switching to Single-Servo Focus Mode (1 focus point), and also set Single-Point AF Area Mode (non-continuous focusing). If your Nikon has external switches, here are the settings (again, I can’t show every type of camera or menu, so look up your settings in your camera manual):


Single-Point AF Area Mode

Single-Point AF Area Mode


Single-Servo AF Mode (AF-S)

Single-Servo AF Mode (AF-S)


Once you are in Single-Point AF mode, all you have to do is simply point that little ‘single’ rectangle (focus point) within the viewfinder at a single eye of the person you are photographing, depress half way to let the camera lock on and focus on that eye, giving you that beep if you haven’t turned the beeps off, then, while still holding the shutter button half way down after the focus is ‘locked’, move the camera around to get a proper composition and fully depress the button to take the actual shot. This allows you to get the eye(s) in focus and still make the shot you wanted even though the eye wasn’t at the dead center of the frame. To make this even easier, you can use your DSLR dial/buttons on the back of the camera to actually move the single focus point around in the viewfinder. If you are shooting a lot of shots where your focus point is off center, or if you just want to get in the good habit of moving your focus point around as needed, manually moving your focus point around to different points is a very useful habit/practice to get into.  For example, if you are shooting a group of people, chances are that all of their heads are at the upper 1/3rd horizontal line in the pic, which, if you move your single focus point up a space or two or three, you no longer have to focus and move the camera around since you can just line up the focus point at the exact place you want the/an eye to be. This is very helpful, especially when shooting a lot. A practice I highly suggest you make a habit.


 All three of these have a Single-Point AF Area Mode. Notice the single red focus point?

All three of these have a Single-Point AF Area Mode. Notice the single red focus point?


Oh, before I forget…multiple eyes. When you are zoomed in on a face and the two eyes are at different distances from the lens, and if only one eye can be in focus, choosing the closer eye almost always works best. Although this can be broken, the vast, vast, majority of the time, the closer eye needs to be in focus for a great shot.


Of course there are times to break this rule, but not often. If a person or object is a secondary and/or unnecessary element in the photograph, then they can often be purposefully out of focus.


So, the next time you are photographing a person or a group, remember to keep the eye(s) in focus. This will help make for better and stronger images and will open up other ideas in regards to where and what you actually want to be in focus. Creativity is your unlimited learning curve, never fully satisfied being the necessity.


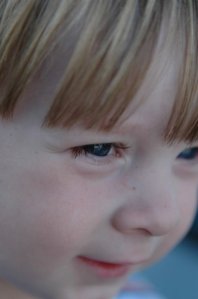
Here’s an example of how just one eye can be in focus, nothing else, and the shot still works.
Jonathon's Eye.

Jonathon’s Eye.


In this image, notice that the eye is actually the point/story, everything else being either eliminated from the composition or out of focus.

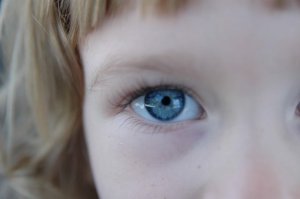
Savannah's Eye.

Savannah’s Eye.


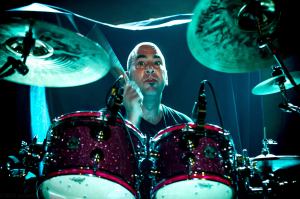
Drummers are a perfect example of getting the eyes correct. Notice that in the image practically everything is at least slightly out of focus except the eyes and face, drawing your eye to his face and putting less emphasis on the drums and other details.

Mike Cosgrove of Alien Ant Farm.

Mike Cosgrove of Alien Ant Farm.


And finally, John Galvin with Molly Hatchet. Notice how John’s eye glasses, in this case being a surrogate for his eyes, are tack sharp while Shawn Beamer, the drummer, in the background is out of focus. In this case, if Shawn had been in focus, there would be confusion about who/what the pic was about.

John Galvin with Molly Hatchet.

John Galvin with Molly Hatchet.


High(er) ISO

Let me start by stating that I am a high ISO junkie. Spending several years as a concert photographer has made me become intimate and comfortable with higher ISO values. What is ISO? Well, for starters, I am not going to get technical on you since that is a page or two on it’s own, especially how it interacts with shutter speed and aperture, but I will cover how to use it and why.

ISO is basically the sensitivity to light of the sensor, or film in the old days. ISO 400 captures twice as much light as ISO 200, 800 four times as much as 200, 1600 eight times as sensitive as 200, etc., etc… This basically allows us to use slower shutter speeds, which is very helpful at night and in other dark situations. After all, who wants to look at a black photograph with nothing or little detail? What’s the point, lol?

There is this huge fear about ISO, mostly due to a complete lack of understanding of it, it’s true limitations, and it’s necessities. Most of our DSLR cameras default to a 100 or 200 ISO. The general rule of thumb is that the lower the ISO, the less problems in the image such as those nasty little green and red speckles along with loss of detail/sharpness. The reality is that each generation of DSLR, and other types of cameras, are consistently getting better with higher ISO values. Just 10 years ago, even ISO 400 was almost too noisy to use on the top end DSLRs, while today, most DSLRs above $600 or so can easily handle ISO settings of 800 or maybe 1600 with little or no degradation to its images. This is great news since it allows us to take images in darker situations that were previously only capable with expensive film.

Many DSLRs now have an auto-ISO setting that allows the camera to add a changing ISO that works in tandem with shutter and/or aperture depending on the auto setting chosen. Read your manual, or better yet an after market book, on your specific camera model to understand how to set this setting. The better DSLRs also give a minimum/maximum range you can set so the auto mode of the camera doesn’t use a high ISO setting that is too high. The down side is that you will have to play around with your own specific camera and experiment to determine how high your ISO can go before it starts degrading your images.

At concerts, I’m using ISO in the 1600-3200 range. The good news is that software can now remove some, and often all, of the nasty colour speckles that are introduced into images through high ISO settings. Again, another area you will need to experiment with your particular camera. The quickie on removing noise is to find the noise reduction setting in your camera and/or your software such as Lightroom, Aperture, or Photoshop. There are plenty of free tutorials on the net that will show you exactly what high ISO noise looks like and how to get rid of it.

Remember that the purpose of this post is not to teach you specifically about ISO and all it’s intricacies, but rather to start using it. If you’re walking through a nature trail, at a late night soccer game with the kids, camping, etc., and it’s just a little too dark (not pitch black) to take pics without the shutter staying open forever, try increasing your ISO to see if you can speed the shutter up to get a shot. And as I mentioned, you need to experiment with your camera to understand it’s limitations. Try setting your ISO to 800, 1600, 2500, and even 3200, and walk around the house to darker areas and take some pics at each ISO setting at the same place and compare them to each other on your PC. If it looks too bad or unusable, then you have a benchmark to start working with.

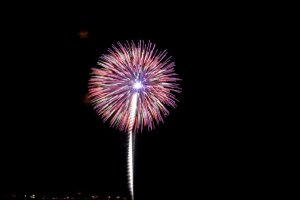
Fireworks shot with ISO 3200.

Fireworks @ ISO 3200

Fireworks @ ISO 3200

Shooting in a museum, I had to use ISO 1250 and STILL used a slow shutter speed of 1/15th of second and very wide aperture of f/2.5 since I couldn’t use a flash.

Piano @ ISO 1250

Piano @ ISO 1250

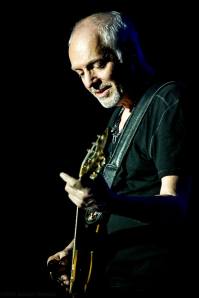
I shot this image of Peter Frampton in concert using ISO 2500 due to the lower light combined with a 1/60th second shutter speed with a 200mm lens, something not advisable due to the camera shake introduced by the hands. But with multiple frames per second, there are almost always images still in perfect focus, even with such a slow speed.

Peter Frampton @ ISO 2500

Peter Frampton @ ISO 2500

Why do I often use a flash during the daytime?

Why do I often use a flash during the daytime??? Yes, that’s a question I actually hear quite often when shooting people during a moderate to well lit day. The simple answer is to evenly light an entire face.

There are a few problems that one can encounter when shooting with natural sunlight:

First, is the horrible shadows. Oh my, how I truly hate seeing a photo with that dreaded dark eye socket look that is a cross between a skull and a raccoon. This is usually due to the sun being too high in the sky and/or at a bad angle causing shadows to form in the depressions of the face. The steeper the angle and/or the brighter the sunlight, the more stark the shadows will stand out from the rest of the face, sometimes even going as far as a magic trick where the eyes seem to disappear into a dark void.

Second is the colour cast. Natural sunlight tends to be warm, and as in warm I mean with a nice little yellow tint, giving the face a wonderful suntan look. This is usually not a bad thing, after all, most of us pale white people would like a nice soft tan without baking on the beach, working on our melanoma collection. But…that extra ‘free’ tan can often make someone warmer (more yellow) than you would like and/or cause other objects in the frame to have the same yellow cast. Imagine the Star Spangled Banner being sung as “red, yellow, and blue”!?!? Yellow stars and stripes are not exactly agreeable on a flag, and there are many other situations where whites being shifted to light yellow is not a good thing.

So how do you solve the harsh shadows on the face and colour cast?

Well, colour cast ‘can’ be as simple as changing your white balance and/or the camera adjusting the white balance for you, but then you lose that nice tan, this being an unfortunate trade off. You can always move the subject away from anything that has to be pure white and then use that wonderful sunlight to get a free tan. You can also change your white balance in-camera to cloudy (or equivalently name setting), which warms up the photo because it assumes that everything is a little cooler (a slight blue cast) than normal. And a final trick is to change the colour temperature within your favourite photo editing software, which is often the best and easiest way of ‘correcting’ or ‘changing’ your colour cast ‘after’ the shot.

But…my favourite trick is to simply use a flash. Why? Because of ‘all of the above’ mentioned earlier, which is that a flash evenly fills in the entire face, eliminating those shadows, and the flash also speaks to your camera and tells the camera to shoot at the same temperature as the light coming out of the flash, which is normally a balanced and correct white, eliminating the colour cast issue. Keep in mind though that if the flash is too weak or too far away, the flash might not get enough light to the subject allowing some of that yellow cast to still creep onto that pretty face, or worse, only one side or area. Also, remember that the flash only illuminates what it can get to, so anything outside of the flash range, such as a flag in the background, may or probably will still have that yellow cast. But all in all, when shooting a portrait or group shot on a sunny or even overcast day, using a flash usually guarantees that those mugs will be correctly lit with the colour you expect.

Oh, btw, get a real flash! I’m talking about that giant flash you put on top of your camera. Those tiny built-in flashes on the top of your camera are usually not very strong, very harsh, and cover a very small angle, which can lead to only the person in the middle of a group shot to be properly lit while the people on the far left and right to be coloured differently, and even worse, barely or not lit up at all losing them to a dread black void.

There are also flash diffusers you can purchase to put on your flash, and believe it or not, even for those built-in flashes. These help soften the light, making the face look a little better, reducing harsh lines and shadows that natural features can cause from even a flash such as giant dimples or sunken eyes. Grandma doesn’t like shadows accentuating her wrinkles, lol. But now I’m wandering into another post on it’s own right.

So…? Try using a flash the next time you’re taking a portrait or group shot during the daylight. In fact, take two shots, the first without a flash and the second with a flash, and then compare them on your computer at home. You’ll probably be surprised how differently they look.

Btw, do I always use a flash during the day? No! But I do use one when I know and/or see that there will be a problem and need for one, which takes a little practice and an attention to detail.

Come to the light side. Our cookies have less calories than the dark side. Bwahahahaaa… (Yes, bad joke.)

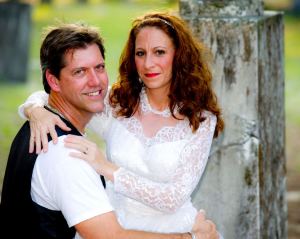
Here’s an example of using a flash on a sunny day. Although the sun was at high noon, which if you look real close at the tops of their heads you’ll see where the sunlight blew out the tops of the hair, the flash allowed me to get a perfect exposure of their faces.

Cemetery Wedding

Cemetery Wedding


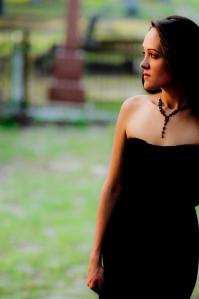
The next two pics were taken literally less than a minute apart. The first will show the harsh lighting of the sun, with dark shadows on the sides/back and almost too bright highlights on the front.

Evening Shadows

Evening Shadows


…and this shot shows how a flash filled in the face, which was unevenly lit, unlike the last shot.

Flash Filled Evening

Flash Filled Evening

Learn Exposure Through Histograms

A great place to start learning exposure is by starting with your histogram. Or is it? Yes and a little bit of no. Yah, kind of, lol. Does that sound confusing?
I hope so, bwahahahaaa.

Read a chapter or a good article on histograms and you’re on your way to making better run of the mill, average lighting situations/scenes pics. But hit a high contrast scene with a very wide tonal range (I.e. More than 9 or 10 stops) and you will be in trouble because the basics you learned about histograms start breaking down.

Huh? You will usually read that a good histogram should look like a mountain/hill with the extreme right and left sides (whites and blacks) at the bottom of the histogram, sloping up to the middle of that ‘hill’.

But this is all too often wrong. Yep, life is confusing and so is your camera, kind of. But it’s not when you learn to recognize why the simple rule of the balanced histogram doesn’t apply to every scene.

Example, take a pic at the bar or concert. A properly exposed and good shot will often be the exact opposite of what the book or teacher taught you. It’ll likely look like a valley instead with a thick section on the left of the histogram and a thin section on the right side going up to the top. Why? Because if the brighter face of the musician is properly exposed, everything else is so dark that it falls well below the tonal range of the camera. Tonal range is the number of f/ stops the camera can record at one time, or the number of doubling or halving the amount of light within a pic. But tonal range is another subject on in its own right now.

Another example is photographing a friend in the shade under a tree on a very bright day. If you have the face properly exposed then the background will be blown out and mostly white, even most of those pretty green leaves that your eyeballs see. But this time the histogram valley will be thicker on the right side because there’s more bright areas than dark areas.

Are you still with me? I hope so. I can speak and successfully teach this fairly simple concept in less time than it takes to type it, but there’s no voice attachment on Facebook posts.

Until you read and learn a little more about histograms and exposure, turn your flash on when the background is brighter than your subject, and only spot meter on your friend’s face when taking their pic in a dark place. Do this a few times and you’ll discover a little eureka moment, even if you don’t understand the why behind it.

I mentioned spot metering. Without getting into that subject, check your camera, or manual, for that default setting of matrix mode. Matrix mode looks at everything in the scene and tries to balance the exposure from the entire scene. Not good for extreme contrast scenes. Switch to spot so that the camera only meters the light in that small rectangular focus point. That way the camera says”hey, this rectangle is the correct amount of light, not everything else I see.

If you’re still lost, buy me a drink the next time we are chatting in a club and I will gladly give you the faster and more effective verbal and hands-on version with your own camera, or Ken Titus if I don’t have mine with me, lol. And if you have your camera with you, I’ll show you how to take that elusive and frustrating shot of the band member on stage without a flash. Of course, your camera may not be ideal for low light shooting, most aren’t, but you can lesson the inevitable grain and noise from a high ISO setting in Photoshop or Lightroom with a very, very, quick click and/or moving a slider setting. It really sounds a million times more complicated than it is. Trust me!

Remember, a ‘pro’ usually makes money from even their bad shots, while an amateur doesn’t get paid for their good shots. Messed up but usually true.

Auto Mode NO More

If you want to take better pics with your DSLR or bridge camera, get off of auto mode and never go back. Start with aperture priority or shutter priority, not program mode. What you need to learn to take good shots in those two modes will teach you the foundations of proper exposure. Exposure plus composition will get you on your way to being a better, if not a good, photographer. Once you can effectively work in both aperture and shutter priority modes, you are ready to go manual mode…the ultimate goal.